Dec 1, 2017

Selecting Tile - Finding the Right Selection in an Ocean of Options


"Art is pattern informed by sensibility."
- Herbert Read -


I'm not going to lie -- selecting tile was difficult.  I can't even imagine doing it without our design guru, Betsy Judd, and Gail Hudson at ProSource.  After obsessively scouring Pinterest for farmhouse tile selections, and after pinning about a million things that spoke to me, I walked in to ProSource with a sense of dread.  I'm not sure if anyone else has this problem, but I struggle with liking TOO many options.  My concern was that I would make a selection and then regret not choosing another.  

Starting off, let me provide some tile lessons learned.  When you are working with a builder, you will almost always be given an allowance for tile.  This means that you base price includes a number (typically a $/square foot) for tile in various areas.  Consider this:
  • The price per square foot likely includes labor.  When trying to stay in a budget, you definitely want to ask about labor prices.
  • The builder may get a discount on the sticker price on the tile, but then consider that the builder will typically mark up any materials supplied.  This does make selecting tile in budget difficult.
  • When a builder has an interior designer, such as Betsy, he/she is able to guide you to selections that will be close to budget.
When attempting to figure out the labor cost, know that there are many different tile patters that will drastically effect the price of labor.

Straight lay or Stack


This pattern is the most common and least expensive tile pattern.

Brick or Offset


This pattern is more expensive than straight but is still pretty reasonable.  Plus, it is very farmhouse-y!

Diagonal


This pattern is identical to the straight pattern, except that the tiles are turned on a 45 degree pattern.  This is much more expensive that the straight stack or the brick pattern due to the angles.  However, it sure does make the floors look bigger!
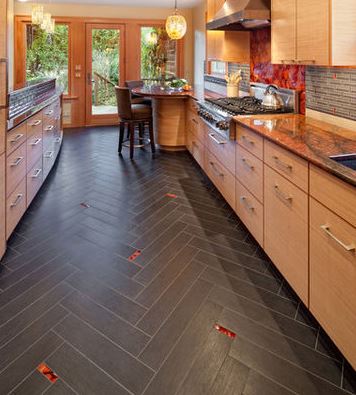

Herringbone


Okay, now my heart goes pitter patter.   This is one of the more expensive patterns but man-o-man does it work.  One thing to consider is the size of your tiles--if you select a larger rectangular tile, the fewer herringbone points you will get.  The picture above is a straight herringbone pattern.  However, the herringbone that I have seen lately have a diagonal lay herringbone.  Something like...


Chevron

Okay, I did not realize that there was a difference between chevron and herringbone.  After all, you get the zigzag both ways, right?  Wrong!  


If you like a tile that is cut like a rectangle, then herringbone will be a lot less labor than chevron. But both a pretty pricey.

Okay, so there are a TON of tile patterns out there, so the list above is by no means inclusive.  We narrowed our tile layouts to TWO farmhouse-inspired options:  herringbone (obviously) and brick.

ProSource uses a fantastic tile installer, William, with Renaissance Tile & Stone.  He is an artisan with such a commitment to quality.  


Tile Inspirations/Selections

Now for the fun part, here are the inspirations, ProSource selections, and installation photos!  Seriously, each area strikes the difficult balance of mouth-dropping design and non-mouth-dropping expense.

Kitchen Backsplash

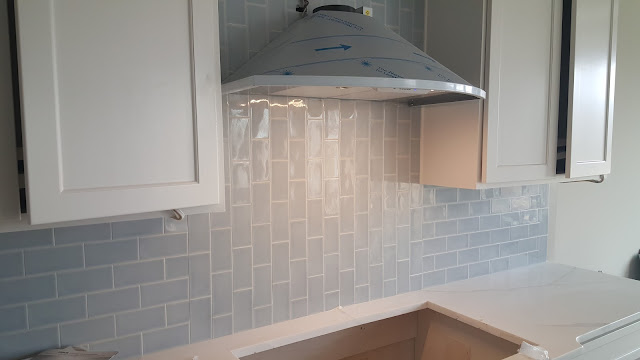
Early on, I knew I wanted a herringbone pattern and a simple tile.  Working within a budget, and trying to keep the overage limited, I thought a white tile would help.  But then I began to realize that a normal brick-shaped tile did not provide the herringbone impact that I was looking for.  I mean, this is gorgeous:


But it definitely is a softer look than this statement backsplash:


The biggest difference is the narrowness of the tile.  I showed this picture to Gail and Betsy and told them to find the least expensive white tile that had this look.  Solution?

2x8" Modern Dimensions, 0190 glossy white (grout bostic silver H700)


Excuse the mess and the dust, but I suppose we are still a construction site :)


On my parents' side, their look is more french country farmhouse.  After all, they have this fabulous blue island and brushed gold accents.  They knew that they wanted a blue tile backsplash, but Betsy suggested a crackled tile that was lighter than their island color.  That way, the island color was the focus, with the backsplash providing a good accent.  We looked at a lot of blue tiles, however, there was only one that gave us a spark:


Adex Ocean Topsail (the solid blue tile in the picture above), (grout bostic diamond h600)


Master Bathroom showers/floors

Even though I am eventually going to install white shiplap in my master bathroom, I still wanted the floors to be a light color.  But with the white cabinets and the *future* white shiplap, I thought that we needed a texture on the floor (plus a tile that has some grit to help avoiding a slip).  Enter Esmer Tile in the color loft:


We decided to have this 35" x 6" floor tiles placed in a herringbone pattern.  After installing the heated floors, these Esmer Loft tiles were placed on an accent wall in the master bath shower and on the floor.  DROOL-worthy!  First it started off with spacers and pencil marks...


But afterwards, gah!


Leading to the toilet room...


...and then the attached laundry room!


Finally, it is difficult to pick out selections without checking out how it will look with the selection next to it.  Here, we had the hardwoods next to the tile, and I think they blend really well (phew!).


For the master bath shower, we wanted something bright and white, but with a bit of a punch :)  So we arrived on the 4x16" artic white polished tiles with an accent waterfall wall of the same 6x35" loft white plank floor tiles and a hint of some vogue white lantern gloss mosaics in the shampoo niches.  


Matt and I loved the idea of hot floors when dragging ourselves out of bed in the morning.  So we selected the Suntouch heated flooring with prodeso matting.  We haven't tried it out yet but I can't wait :)

My parents selected the same 4x16" arctic white polished tiles for their shower.  However, their cool upgrade was to add darker 4x24" Elaganza Verese tiles to the outside shower wall.  I find myself having a bit of tile envy...


As you can see above, my laundry got the same herringbone tile as the master bath.  Because my parents' laundry room is separated from the master bath, they got to select a different tile.  And they killed it!  They selected the fun: 4x8" Havanna Sky (grout cbp chateau)


And installed next to the hardwoods, it looks EVEN COOLER!  Talk about tile that just makes you smile...


Girls' and Guest Bathrooms

The downstairs guest room have a full bath that doubles as the main floor bathroom, so we decided to kick it up a notch.  

4x16" arctic white polished (bricklay) with the 8x24" eleganza cenere (brick lay)

 *pictures to follow, still waiting on bullnose*

For the girls' bathrooms and the upstairs guest bathroom, we decided to stay in budget but still get something fun.  We went with the 3x6" arctic white polished (brick lay) with 12x12" skybridge gray floor tile (brick lay).  It turned out great and was (gasp) in budget!


We could not be any happier with the tile selections.  We are still waiting on the fireplace tile and the hall bathroom tile.  After seeing how amazing the rest of the tile turned out, it is even HARDER to wait!

But as a preview, the fireplace tile looks like this (spoiler alert, it is a herringbone pattern silver travertine honed mosaic):


Sep 8, 2017

Let There Be Light! How to Select Interior Lighting


"It is better to light a candle than curse the darkness."
Eleanor Roosevelt

Selecting lighting for a new construction build...wow.  Who knew there were so many lights around your house?   When our designer, Betsy Judd, texted me and said "Okay, picking out lighting is next on our plate", my eyes got wide.  How the heck do you even EAT that elephant?  The answer?  One bite at a time...

Here is how we tackled the lighting beast, both outlining our strategy and describing our selection options/selections.  Oh yeah, and there might be some lessons learned sprinkled in there along the way.  Per usual, J.S. Robinson delivered when they sent us to Wilson Lighting.  I would highly recommend Wilson to help you with any lighting project.  I was under the false impression that I could find lights cheaper online...not so!!!  

Organizing Your Lighting Needs

For me, I needed to have a complete list of lighting needs before I could start tracking selections.  Your lighting specialist may help you with this activity, so you may consider checking before completing this endeavor (as it was very time consuming).  However, I would have likely done it regardless because I am very thorough (my husband may have another word for it, but I digress...).

When creating this document, my initial thought was to list the various rooms vertically, then keep a tally of what type of lights were needed, how large they should be, and how many per room.  So let's talk about that:

Chandelier


Most people consider these the large fixtures that hang from the ceiling.  No moving parts, like a ceiling fan would have.  Just a large fixture (for a large room).

To size a chandelier, lighting designers typically suggest that you add the room's dimensions (in feet), then the chandelier's diameter (in inches) equal that number.

For example:  a room that is 16 ft x 18 ft, add 16+18 = 34.  A chandelier for this room should be approximately 34 inches in diameter.

Pendant


Think chandelier, but smaller.  Picture lights that hang from the ceiling but hang over a kitchen island.

To size an island pendant, there were not many hard and fast rules that I could find.  One website talked about using a similar measurement technique as the chandelier sizing.  So we measured the length/width of our island (in feet), then each pendant's diameter (in inches) equal that number.

For example:  my island is 9.5 ft x 5 ft.  To calculate the diameter of each of my two pendants, I added 9.5 ft + 5 ft = 14.5.  So each pendant should be approximately 14.5 inches in diameter.

Flush mounted or Semi-flush mounted


These are the lights that hang from the ceiling but hang very close to the ceiling.  I always used to picture the old "boob" lights but there are so many cool versions now.

Ceiling fan


Ceiling fans involve a lot more nuance with their selections/options.  The first thing to consider is whether you need a light or not (lighting packages are expensive).  I was very impressed when our lighting specialist mentioned that if you have can lights in a room, there really is not a need for a fan with a light!  Bingo!

Now for the difficult part - what size ceiling fan to you need for each room?  To figure this out, you first need to determine the square footage of each room that needs a ceiling fan (multiply the length by the width of the room).  From there, most lighting experts will recommend the following:


But of course, this is not the end of the story.  You also need to know what length downrod, if any, you would need for a ceiling fan.  The rule of thumb is if your ceiling is 9 ft tall or higher, you will generally want a downrod to lower the ceiling fan.  The length of the downrod is generally determined based on the following:


Organization of Information

For those of you keeping track, you need to break your house into rooms, list what type of light fixture you need for each room, list each room's ceiling height, length/width (in feet), and square footage.  Phew!  

The other item I didn't consider until later was that I needed to track what finish I selected on plumbing fixtures in the various rooms to make sure the lighting did not clash with the plumbing.  In case you want a glimpse into what my tracking spreadsheeet looked like, here is the information just for one side of the house (and not the outside):  


While this was a ton of work in advance, I will say that having this spreadsheet printed off during the lighting appointment made everything awesome.  We were able to quickly make selections and I was able to answer questions quickly without trying to read architectural plans and running calculations during the lighting appointment.

Drum Roll Please...OUR SELECTIONS!!!

Well, as you can see, this was a long process.  My husband would always laugh because whenever he woke up in the middle of the night and I was on my computer/phone, he asked "Looking at lighting again?"  There are just so many cool options for lighting, which can make the selection process overwhelming.  

Enter the dream team, Chalese  Bierle with Wilson Lighting and Betsy Judd, our design guru.  This team together guided us through the complicated process of lighting selections.  Chalese took this a step further...she was able to remember what lighting vendor's catalogue had lighting that was similar to a picture I showed her.  IT. WAS. INCREDIBLE.  We would walk around Wilson, which already had a huge selection lit up and shown, but if something did not strike your fancy, Chalese was able to look at a picture (likely from Pinterest) and immediately remember where that item was in a catalog or something super similar.  Chalese and Betsy were also pros at pointing us in the direction of less expensive alternatives that gave similar bang for your buck.  

I would highly recommend Wilson lighting for any lighting project, big or small.  Their prices beat online retailers and it was so helpful to see the lights in person.  Plus, experts like Chalese can help you narrow down options in a cost effective way.  

And without further ado, here are our selections!

Chandeliers

The piece de resistance, the cherry on the top, the cat's meow...all descriptions for this totally awesome chandelier.  I saw it a couple months back on Wilson Lighting's instagram and fell in love.  


 It is the Moorsgate Multipendant from Currey and Company.  It is even more beautiful in person.  This will be the chandelier that drips down the center of the stair tower.  


This dreamy geometric chandelier is both modern and industrial.  It carries the brushed gold finish on my parents' side and will grace their entry in the clerestory. 


While this is not technically a chandelier, I had to include it in this category due to its general AWESOME-NESS.  I struggled with whether to have a ceiling fan in my great room or not.  I love ceiling fans, but man do they tend to look rather boring.  I thought the great room needed a BANG! and so I assumed I would just get a chandelier.  But then, one day, I strolled into Wilson Lighting and saw this amazing showstopper:


This ceiling fan is a modern farmhouse dream.  It is big, bold, and just a total conversation piece.  Love it!

Over my dining room table, I was looking for something with clean lines and not super expensive.  Chalese pointed me to this beautiful chandelier, which I immediately said yes to!


Last, but not least, my closet ceiling was raised and could now have a fun chandelier.  I was struggling with selecting a chandelier or even really narrowing it down.  But then I walked by this beauty and fell in love...


Pendants

To try to be somewhat reasonable on lighting, I asked Chalese to point me to kitchen island pendants that were cool but not super pricey.  I also mentioned that I don't mind seeing a bulb.  Chalese stood up and confidently led me to this light, which I loved!


My Mom wanted kitchen island pendants that had the brushed gold finish and where you couldn't see the light bulb.  AND if they could have that cool modern farmhouse style, that would be a bonus.  Chalese went to the large volumes of product manuals, started flipping through, and then showed us this winner:


Sconces

As I discussed in the blog post on electrical selections, we have a slight sconce obsession in this house.  Ever so slight...

Okay, so they are everywhere.  Over our floating shelves in the kitchen, pantry, and laundry room, we went with this farmhouse sconce but got an extended neck (longer than the one pictured below):


As we discussed in the electrical blog post, we decided to have two hardwired sconces next to our master bedroom beds to try to save nightstand space.  So, in my bedroom, we selected the following:


For the long central hall, these industrial sconces will guide the way for our guests:


Flush-mounted Lights

We tried, I mean, we really tried, to pick out some low-cost flush mounted lights.  And we succeeded ... occasionally!  Here are some great farmhouse flush-mounted lights that were not a flat LED disk light:


In my laundry room, I wanted something inexpensive but very cheerful.  Chalese found this awesome light...so fun!!!


I am using the similar light (but with a more subtle color) in my pantry.

Ceiling Fans

Well, I already spilled the beans on the most awesome ceiling fan selected, specifically the windmill ceiling fan.  But, we actually have some other cool options (check the pun on the word cool...)

We fully expect our favorite hangout spot to be the screened-in lanai.  Therefore we wanted a big a$$ fan to make this area as comfortable as possible.  And so, here is the big a$$ fan we picked (80" with no light since there are can lights):


My parents selected a similar-looking ceiling fan for their great room (with no light since there are can lights):


For our master bedrooms, we were still thinking about that awesome lanai fan.  So we mirrored it, but in the smaller 60" size (without a light since there are can lights in the masters).  Also, this is the same ceiling fan that is on our covered deck (so it matches the lanai).


For the majority of our bedrooms, including the girls' bedrooms, guest bedrooms, and playroom/loft, we selected an inexpensive white ceiling fan with a light:

Bathroom Sconces

The master bathrooms have two sconces that flank each bathroom mirror.  We wanted inexpensive fixtures that would provide soft lighting for makeup application.  So we went for these beauties:


For the other bathrooms, we opted for an inexpensive bathroom sconce that was still beautiful.


Related Posts Plugin for WordPress, Blogger...