- Herbert Read -
I'm not going to lie -- selecting tile was difficult. I can't even imagine doing it without our design guru, Betsy Judd, and Gail Hudson at ProSource. After obsessively scouring Pinterest for farmhouse tile selections, and after pinning about a million things that spoke to me, I walked in to ProSource with a sense of dread. I'm not sure if anyone else has this problem, but I struggle with liking TOO many options. My concern was that I would make a selection and then regret not choosing another.
Starting off, let me provide some tile lessons learned. When you are working with a builder, you will almost always be given an allowance for tile. This means that you base price includes a number (typically a $/square foot) for tile in various areas. Consider this:
- The price per square foot likely includes labor. When trying to stay in a budget, you definitely want to ask about labor prices.
- The builder may get a discount on the sticker price on the tile, but then consider that the builder will typically mark up any materials supplied. This does make selecting tile in budget difficult.
- When a builder has an interior designer, such as Betsy, he/she is able to guide you to selections that will be close to budget.
When attempting to figure out the labor cost, know that there are many different tile patters that will drastically effect the price of labor.
Straight lay or Stack
This pattern is the most common and least expensive tile pattern.
Brick or Offset
This pattern is more expensive than straight but is still pretty reasonable. Plus, it is very farmhouse-y!
Diagonal
This pattern is identical to the straight pattern, except that the tiles are turned on a 45 degree pattern. This is much more expensive that the straight stack or the brick pattern due to the angles. However, it sure does make the floors look bigger!
Herringbone
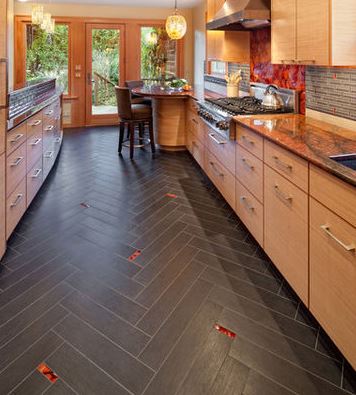
Okay, now my heart goes pitter patter. This is one of the more expensive patterns but man-o-man does it work. One thing to consider is the size of your tiles--if you select a larger rectangular tile, the fewer herringbone points you will get. The picture above is a straight herringbone pattern. However, the herringbone that I have seen lately have a diagonal lay herringbone. Something like...
Chevron
Okay, I did not realize that there was a difference between chevron and herringbone. After all, you get the zigzag both ways, right? Wrong!
If you like a tile that is cut like a rectangle, then herringbone will be a lot less labor than chevron. But both a pretty pricey.
Okay, so there are a TON of tile patterns out there, so the list above is by no means inclusive. We narrowed our tile layouts to TWO farmhouse-inspired options: herringbone (obviously) and brick.
ProSource uses a fantastic tile installer, William, with Renaissance Tile & Stone. He is an artisan with such a commitment to quality.
Tile Inspirations/Selections
Now for the fun part, here are the inspirations, ProSource selections, and installation photos! Seriously, each area strikes the difficult balance of mouth-dropping design and non-mouth-dropping expense.
Kitchen Backsplash
Early on, I knew I wanted a herringbone pattern and a simple tile. Working within a budget, and trying to keep the overage limited, I thought a white tile would help. But then I began to realize that a normal brick-shaped tile did not provide the herringbone impact that I was looking for. I mean, this is gorgeous:
But it definitely is a softer look than this statement backsplash:
The biggest difference is the narrowness of the tile. I showed this picture to Gail and Betsy and told them to find the least expensive white tile that had this look. Solution?
2x8" Modern Dimensions, 0190 glossy white (grout bostic silver H700)
Excuse the mess and the dust, but I suppose we are still a construction site :)
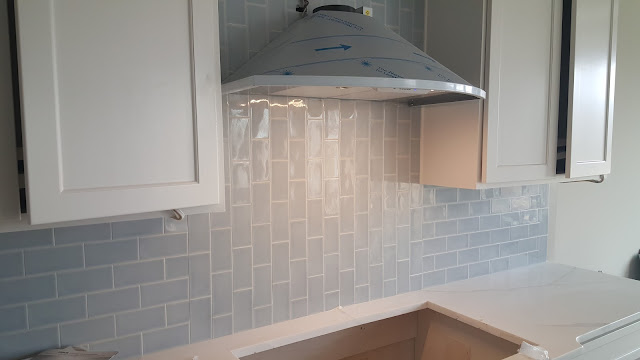
On my parents' side, their look is more french country farmhouse. After all, they have this fabulous blue island and brushed gold accents. They knew that they wanted a blue tile backsplash, but Betsy suggested a crackled tile that was lighter than their island color. That way, the island color was the focus, with the backsplash providing a good accent. We looked at a lot of blue tiles, however, there was only one that gave us a spark:
Adex Ocean Topsail (the solid blue tile in the picture above), (grout bostic diamond h600)
Master Bathroom showers/floors
Even though I am eventually going to install white shiplap in my master bathroom, I still wanted the floors to be a light color. But with the white cabinets and the *future* white shiplap, I thought that we needed a texture on the floor (plus a tile that has some grit to help avoiding a slip). Enter Esmer Tile in the color loft:


We decided to have this 35" x 6" floor tiles placed in a herringbone pattern. After installing the heated floors, these Esmer Loft tiles were placed on an accent wall in the master bath shower and on the floor. DROOL-worthy! First it started off with spacers and pencil marks...
But afterwards, gah!
Leading to the toilet room...
...and then the attached laundry room!
Finally, it is difficult to pick out selections without checking out how it will look with the selection next to it. Here, we had the hardwoods next to the tile, and I think they blend really well (phew!).
For the master bath shower, we wanted something bright and white, but with a bit of a punch :) So we arrived on the 4x16" artic white polished tiles with an accent waterfall wall of the same 6x35" loft white plank floor tiles and a hint of some vogue white lantern gloss mosaics in the shampoo niches.
Matt and I loved the idea of hot floors when dragging ourselves out of bed in the morning. So we selected the Suntouch heated flooring with prodeso matting. We haven't tried it out yet but I can't wait :)
My parents selected the same 4x16" arctic white polished tiles for their shower. However, their cool upgrade was to add darker 4x24" Elaganza Verese tiles to the outside shower wall. I find myself having a bit of tile envy...
As you can see above, my laundry got the same herringbone tile as the master bath. Because my parents' laundry room is separated from the master bath, they got to select a different tile. And they killed it! They selected the fun: 4x8" Havanna Sky (grout cbp chateau)
And installed next to the hardwoods, it looks EVEN COOLER! Talk about tile that just makes you smile...
Girls' and Guest Bathrooms
The downstairs guest room have a full bath that doubles as the main floor bathroom, so we decided to kick it up a notch.
4x16" arctic white polished (bricklay) with the 8x24" eleganza cenere (brick lay)
*pictures to follow, still waiting on bullnose*
For the girls' bathrooms and the upstairs guest bathroom, we decided to stay in budget but still get something fun. We went with the 3x6" arctic white polished (brick lay) with 12x12" skybridge gray floor tile (brick lay). It turned out great and was (gasp) in budget!
We could not be any happier with the tile selections. We are still waiting on the fireplace tile and the hall bathroom tile. After seeing how amazing the rest of the tile turned out, it is even HARDER to wait!
But as a preview, the fireplace tile looks like this (spoiler alert, it is a herringbone pattern silver travertine honed mosaic):


